Micro-KIM Tutorial: The LED Display
The following schematic illustrates what is fun about retro computing: the complete schematic of a microcomputer fits on a single page (a higher resolution PDF can be downloaded from the Briel Computers website).
 |
| Micro-KIM Schematic. Courtesy Vince Briel - Briel Computers |
The schematic shows that the 6 character LED display is controlled through some selection logic by the data ports of the 6532 RIOT. Because the 16 pins of the two 8-bit data ports A and B would not have sufficed to control all characters in the LED display simultaneously, instead a few bits of B select one character (value 9 selects the first, value 11 the second, etc.) while the lower 7 bits in A are used to control the 7 segments of that particular character (bit 0 controls the top segment, bit 1 upper right segment, etc.).
Note that with this scheme, it is possible to set one character and "go on with the program", as I showed in an earlier tutorial by displaying a very bright 8 in the first character, followed by simply looping the program (it could do something else instead). However, it is not possible to set all characters somehow, and "go on". Instead, the program has to loop over all characters and constantly refresh their contents. Due to the refreshing loop, displaying the full display appears a bit less bright than displaying a single character without such a loop.
Now let's write down some code to control the full LED display (as before, you can find the source code on my Micro-KIM webpage). First, some definitions provide symbolic names for the addresses of the data ports of the 6532 RIOT. The data registers contain the actual values, whereas the bits of the data direction registers define whether each pin is used for input (0) or output (1).
sad = $1740 ; A data register
padd = $1741 ; A data direction register
sbd = $1742 ; B data register
pbdd = $1743 ; B data direction register
Next some initialization code sets the 6532 RIOT data direction registers for output on the needed pins.
.org $0200
lda #$7f
sta padd
lda #$3f
sta pbdd
Then, the refreshing loop looks as follows. Here, register x iterates from 0 to 5 to load the proper value for the 7 segments of each character from a data array (with values that define the string "aart b"). Register y iterates from 9 to 19 with increment 2 to select each subsequent character on the LED display through data register B. Note that before changing data register B, the program clears data register A to ensure the old contents do not accidentally "flicker" very briefly in the next character. Furthermore, the program has a short delay when each next character is shown to ensure that character "glows up" a bit before moving on.
display_loop ldx #0
ldy #9
char_loop lda #0
sta sad ; no flicker
sty sbd
lda data, x
sta sad
txa
ldx #4
char_delay dex
bne char_delay ; glow up character
tax
inx
iny
iny
cpx #6
bne char_loop
char_loop lda #0
sta sad ; no flicker
sty sbd
lda data, x
sta sad
txa
ldx #4
char_delay dex
bne char_delay ; glow up character
tax
inx
iny
iny
cpx #6
bne char_loop
jmp display_loop ; keep refreshing
data .byte $f7 $f7 $d0 $f8 $00 $fc
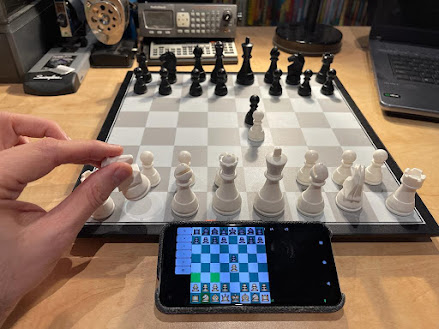
Assembling, uploading, and running this program as shown in earlier tutorials shows the following output on the LED display. Of course, feel free to change the values in the data array to your own custom-made characters.
That's it for this tutorial. Next tutorials will talk more on controlling the brightness of the LED display, scrolling text, moving graphics, and using interrupts to implement the refreshing loop.
 |
| Taking full control of the LED display |
That's it for this tutorial. Next tutorials will talk more on controlling the brightness of the LED display, scrolling text, moving graphics, and using interrupts to implement the refreshing loop.

Comments